Note: If you use Wirecast for streaming, you might want to try my other re-streaming server instructions as our Mac version of Wirecast didn’t like this one much. It wasn’t perfectly reliable. Howevever our hardware streamer worked great with this one, and other people have great success with it with other streamers as well. The linked one works well with Wirecast. https://timstreams.com/another-type-of-re-streamer-using-node-js/
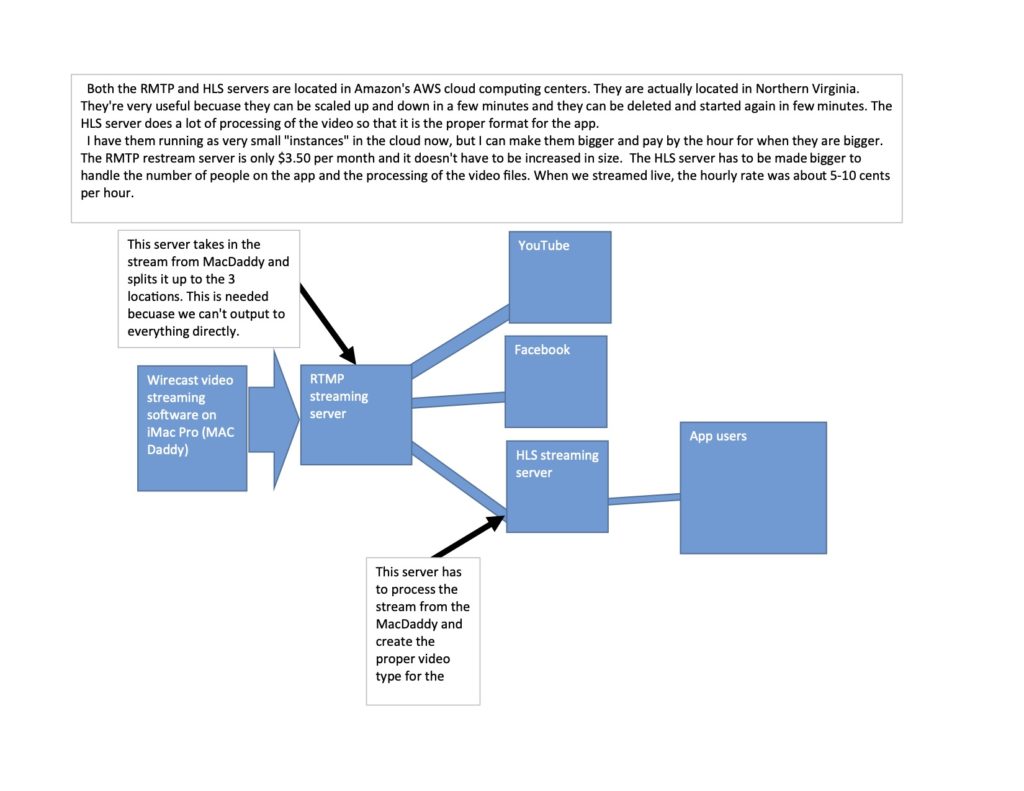
I have been asked a few times for some very simple to follow server creation instructions that people can follow to make a server that can take a single RTMP feed and send it along to multiple services. In this case I have personally used this to send a stream to Facebook and YouTube at the same time. It only requires going to the Facebook and YouTube pages and telling them to start the live post.
I just went through the following steps and created a new streaming server in about 20 minutes. It was very fast and I didn’t really think much about what I was doing. I just sort of blindly followed this. At the end I tested it with my Facebook page and it said it was receiving it and was ready for me to go live.
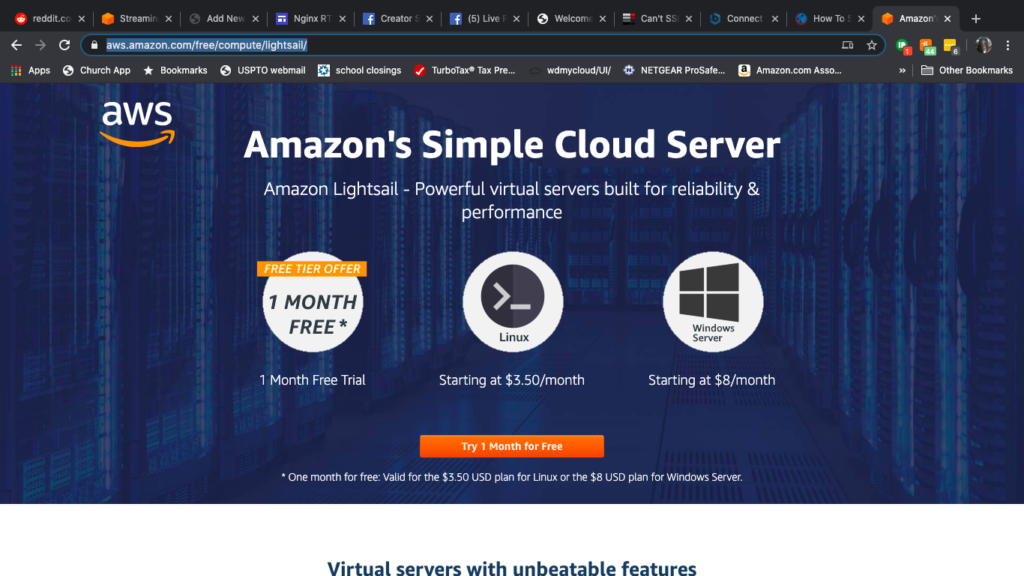
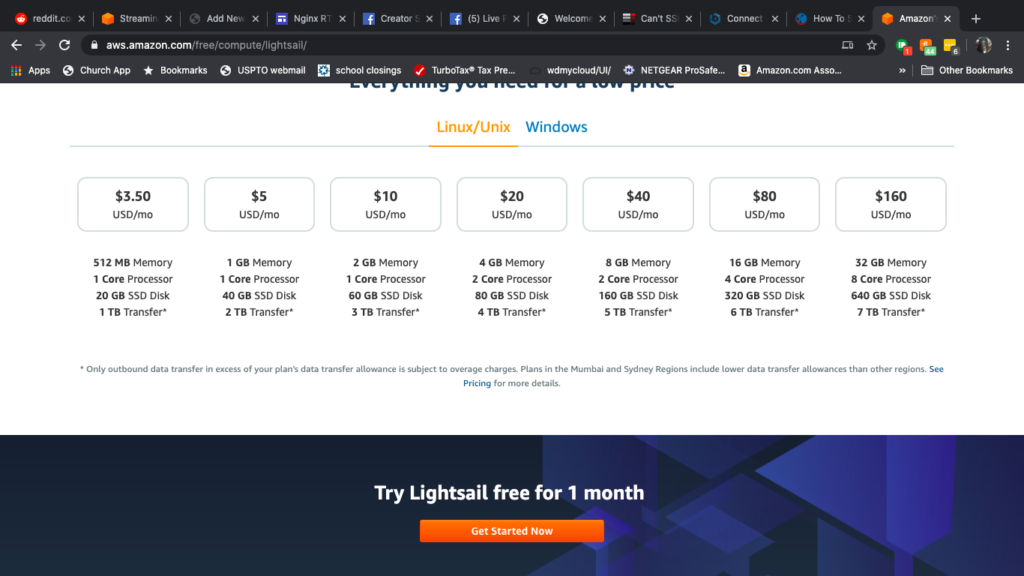
This process I describe uses Amazon Lightsail servers that are very cheap and easy to use. The server that’s needed is $3.50 per month. In the cases I’ve been asked about churches are trying to do this and I assume you would need this for something like Sunday and Wednesday night each week. This would use about 5GB of data each time, so about 10 to 20GB per week. Which means about 80GB per month for the input stream. If you send this to Facebook and YouTube you are also sending out 160GB per month out of the server. This is well within the 1TB per month that the Lightsail small server gives you included for your $3.50.
The first step in the process is to to to Amazon Lightsail. The website address is : https://aws.amazon.com/free/compute/lightsail/ They even have a one month free trial of their services for the smallest one. That’s the one we want so it’s great just to try for this. So even if you don’t know what you’re really doing, you aren’t even out anything to try.
Go to Get Started Now and begin. You’ll have to create an Amazon AWS account to start, but that’s easy. (I bet you’ll like it after the first month too) I can’t go back through this because I already have an account. I don’t think I can walk you through some of those details because of that.
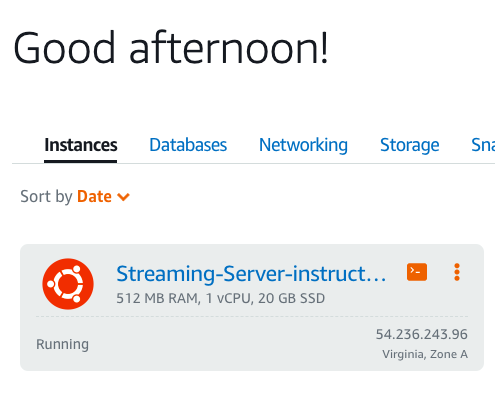
However once you are through with that, you should get to a page that looks like this:
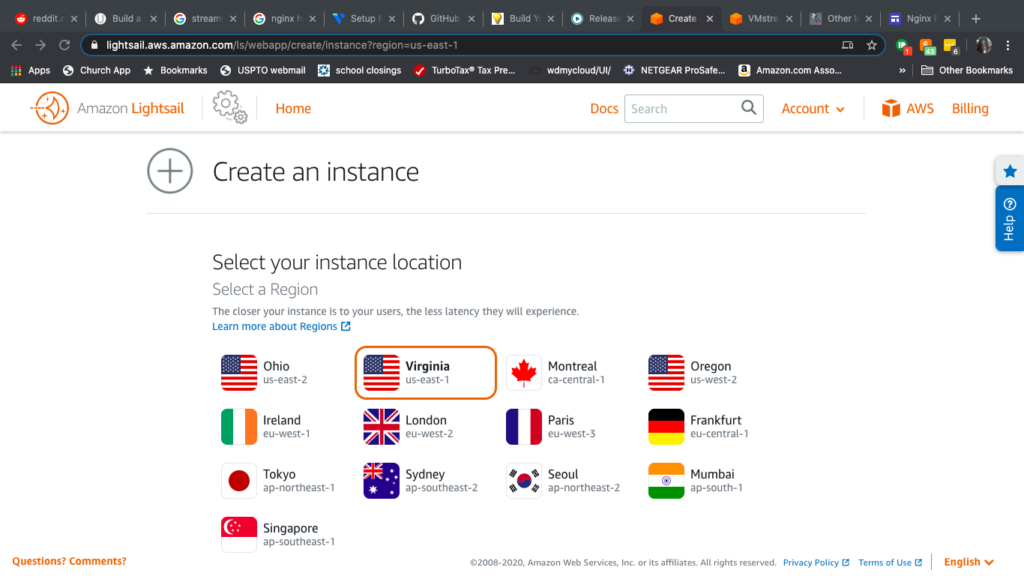
From here you choose your instance location. I always choose Northern Virginia for two reasons. One is that I’m located 40 miles from these server farms. Two is that these are probably some of the fastest server farms in the world.
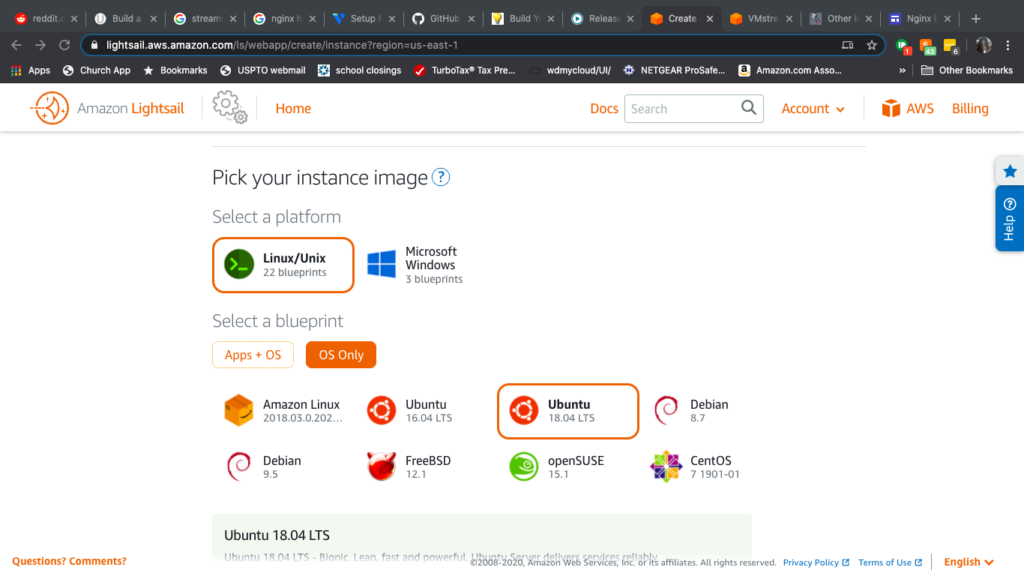
Next you have to pick the OS for the server. Also you have to choose “OS Only” and I choose Linux with Ubuntu being the image I want. It runs the software amazingly and the instructions assume these choices. Now we have to name our “instance”. I like something like “re-streamer” or something of the sort.
Next you have to wait for it to be created, that takes about a minute or less. Once it’s up and running, we can log into it via the browser. That is very simple and you just click the hyperlinked name of your server. That brings you to a page with a huge button that says “Connect Using SSH”. That’s what we want.
Then it brings you to a command prompt. This is where we’ll issue all our commands to make the server do all our work.
The following directions mostly follow from the following page: https://sites.google.com/view/facebook-rtmp-to-rtmps/home
Now that we have a server created and the instance is running and we are in the command prompt.
The first step is to install Nginx and Stunnel. Stunnel is what’s needed to make Facebook work, it requires an RTMPS feed. If you don’t want Facebook to work, it’s even easier because you can leave a few steps out. We won’t go into that in this post because most people want to stream to Facebook and YouTube at least.
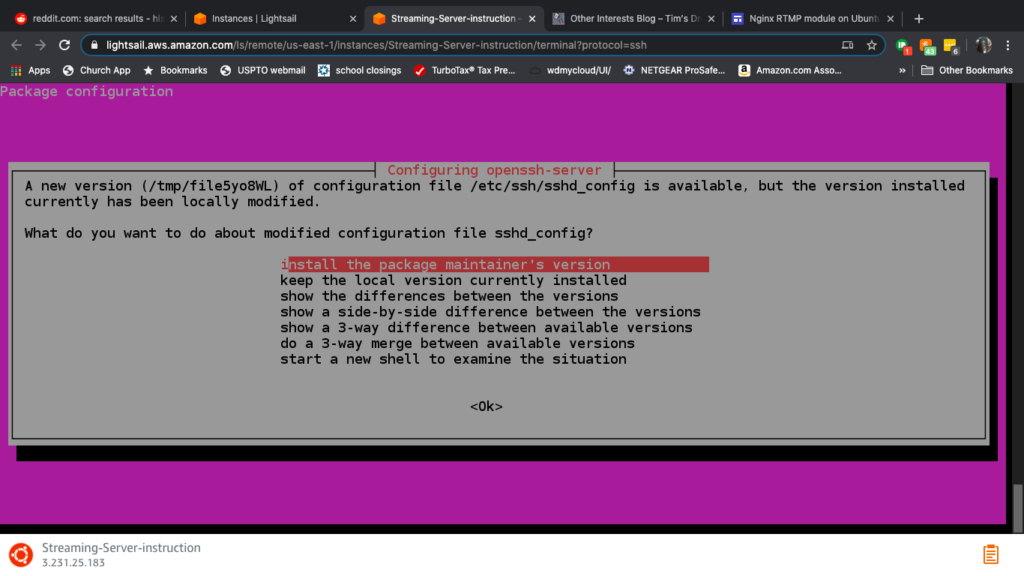
To install Nginx and Stunnel we do the following: (litterally) copy and paste these each individually into the command prompt and hit enter. Some of them will ask questions as you go, like do you want to continue, it will take some amount of disk space. You have to agree, but it is always small and we have 20 usable GB of disk space. We’re not concerned. You also will get a couple windows like in the pictures below, choose YES on them or choose the Top Choice. These windows with the images need to be selected with the arrow keys to highlight the choice and then use the enter key to choose it.
If while you’re using the command prompt you have to re-type the last thing you did before, you can just hit the up arrow key. It will retype the last command automatically. Also as a note in the command prompt the mouse can’t be used to move the cursor, you have to use the arrow keys.
sudo apt-get updatesudo apt-get upgradesudo apt-get install nginx -ysudo apt-get install libnginx-mod-rtmp -y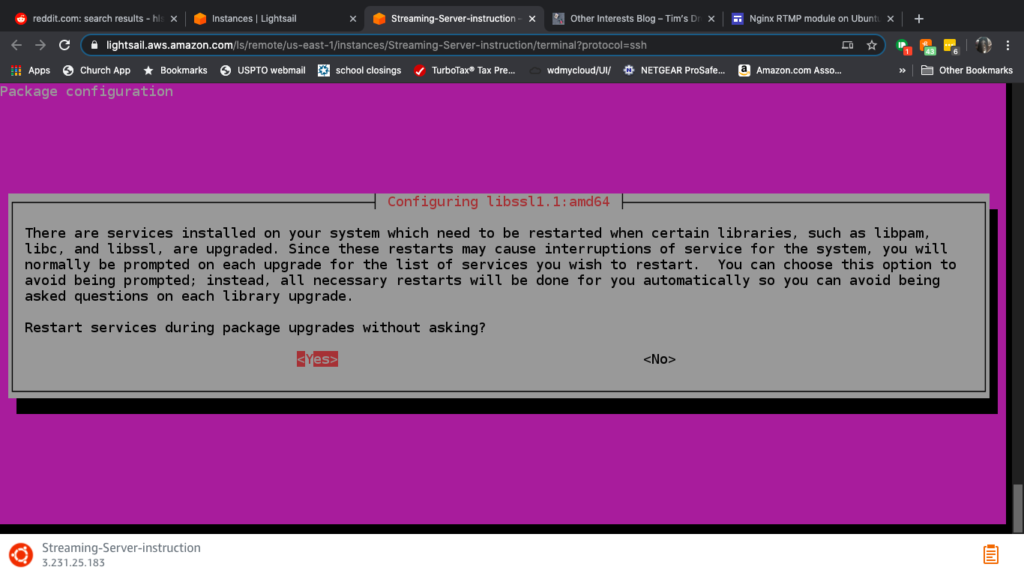
This is totally optional: What I like to do occasionally is take a “snapshot” of the instance. This makes a copy of it’s drive and allows us to recreate it immediately if we mess anything up. The snapshot is like our backup plan if we really destroy this thing. It will save time if you have go try again. The only downside is that we pay a few cents a month to store each snapshot. You can delete any of them at any time.
Next we’ll edit the configuration file that runs Nginx. This file is what does most of the work that we need. The configuration is how we tell it what we want to do. Cut and paste the below into the command prompt.
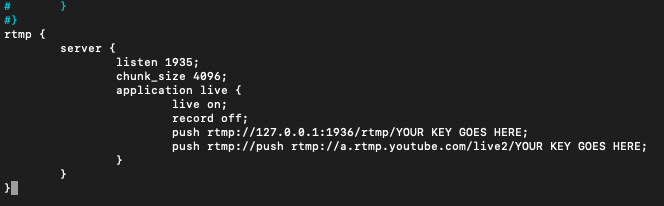
sudo nano /etc/nginx/nginx.confAt the very bottom of the nginx.conf file, under the other stuff that’s already there, paste this in in it’s entirety:
rtmp {
        server {
                listen 1935;
                chunk_size 4096;
                application live {
                        live on;
                        record off;
                        push rtmp://127.0.0.1:1936/rtmp/<<Facebook persistent stream key >>;
push rtmp://a.rtmp.youtube.com/live2/<<YouTube persistent stream key >>;
                }
        }
}
You’ll have to insert your Facebook persistant key in place of the note in this code. The key should go between the / and the ; This push command sends our stream and Facebook Key to stunnel so it can be made secure for Facebook to accept it. Below this “push” command we can put another in so we can send to YouTube or anywhere else we want. You can see an example from my personal nginx.conf file below. For YouTube you’ll have to add a push command that sends it to “rtmp://a.rtmp.youtube.com/live2/”. You’ll have to put your KEY after the last / and then put a ; at the very end of that line.
After you’ve modified the nginx.conf file you have to save it and close it, so you press cntrl-x, then it will ask if you want to do that to the current named file and you hit the Y key, and then press enter for it to save the file.
If you need to keep other streamkeys and push commands in there when they aren’t needed, you can comment them out by using the # symbol at the start of the line. That makes the computer skip over that line and just go to the next one.
Now we have to restart Nginx because we’ve modified the configuration file. Paste in the following command into the command line.
sudo systemctl restart nginxWhen you attempt to restart nginx, if it doesn’t work, you have errors in that nginx.conf file. You have to be sure it looks just like the examples or it won’t run properly and will fail. Be sure you have ;’s after the lines of the push commands.
If at any point you have to re-adjust the .conf files, you’ll need to restart nginx again.
Next you can test it with some simple software like VLC along with OBS or your churches streaming software or hardware encoder. You’ll need your RTMP feed to go to your server IP address which is seen on the home page of the instances of Lightsail. It’s on the bottom right above your server location. You can also set it to make it static at this point, but that will give it a new one that will not change. You’ll want that so you don’t always have to change your OBS or streaming software or hardware. To make a static IP just go to the instance by clicking the hyperlinked name and then choose networking from the options across the middle of the page. Then choose static IP on the left.
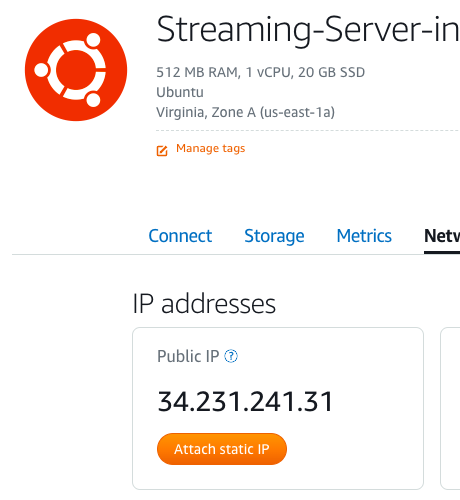
You should also set the firewall rules to allow port 1935. That’s the one that RTMP is on and we do that through the networking page under the IP information. Under the IPV4 Firewall section of that networking page you just click on the +Add rule button. From there you add the port 1935.
In OBS or your hardware encoder choose these options in the stream settings:
Service: Custom
Server: rtmp://<<ngnix server IP address>>/live
Stream Key: test
For a playback test use VLC or something that can play RTMP streams. Set it up as follows: Go to Network Stream, Network.
network URL: rtmp://<<ngnix server IP address>>/live/testAfter we have that all running. We have to get stunnel so that facebook will work. We’ll go back to the command prompt from your server. Issue the following commands to get stunnel.
sudo apt-get install stunnel4 -yNow we’ll have to change stunnel’s boot configuration, issue the following command:
sudo nano /etc/default/stunnel4Change Enabled from 0 to 1. It should look like the following:
ENABLED=1Next we have to edit the stunnel configuration file.
sudo nano /etc/stunnel/stunnel.confYou’ll have to cut and paste this in its entirety. It should look like this:
pid = /var/run/stunnel4/stunnel.pid
output = /var/log/stunnel4/stunnel.log
setuid = stunnel4
setgid = stunnel4
# https://www.stunnel.org/faq.html
socket = r:TCP_NODELAY=1
socket = l:TCP_NODELAY=1
debug = 4
[fb-live]
client = yes
accept = 1936
connect = live-api-s.facebook.com:443
verifyChain = no
Then of course you’ll have to use ctrl-x to exit, and Y to save it as the original named file.
Next we have make it enabled after boot by doing the following:
sudo systemctl enable stunnel4.serviceNow we have to restart stunnel because we changed the configuration files.
sudo systemctl restart stunnel4.serviceNow since we changed the stunnel configuration and all we should restart NGINX for good measure.
sudo systemctl restart nginxEverything should be up and running at this point. You might want to take a snapshot again here, because that way you can always fix anything else that goes wrong. Also if you want to further modify this for other purposes to make it better later you have a good jumping off point to create a new instance. 🙂
Because this is not limited to who can send a stream to it and it’s sitting exposed with port 1935 open, you might either want to delete the open port of 1935 in Lightsail when it’s not in use, or just shut it off when not in use. If you want to shut it off when not in use just issue the command “sudo systemctl stop nginx”. This way no one else can send it anything. When you want to start it again obviously issue “sudo systemctl restart nginx”. If you want to solve it a better way yet, you can find your IP address for your church and make it so that only people coming from your church’s IP address can stream to your server. You would have to add a few lines in the beginning of that rtmp section of the nginx.conf file. You add the “allow publish 000.000.000.000;” and “deny publish all;” below the “chunk_size 4096;” and above the “application live {“. You’ll have to put your locations IP address in that field where the zeros are in my example.
rtmp {

        server {

                listen 1935;
                chunk_size 4096;
                #below is IP for your streaming location
                allow publish 000.000.000.000;
                #below is so others can't use the server
                deny publish all;

                application live {
Remember that whenever you change the nginx.conf file you have to restart the service so that the changes take effect by using the command : sudo systemctl restart nginx
If you need more help, please email me tim@timstreams.com or find me on Facebook.
On about May 5th, As a note, I had my 12 year old run through this and try out my instructions. He’s never done anything like this at all. He is a gamer though and has used computers for years in schooling. It took him 1 hour and 2 minutes including when I made a mistake when setting up streamkeys and also with him giving me junk for minor spelling issues and unclear instructions. I’ve since fixed most of the points he helped me with. I’ll probably use his server to stream the Live church service Wednesday night.