Recently I was re-introduced to the server software and program called Jitsi-Meet. It’s a zoom alternative that you can run on your own cloud server and provide a private and secure video conferencing experience without paying by the meeting host, or for time or anything. Just pay for the running VPS (Virtual Private Server). It can be run on small instances on Amazon Lightsail or even more easily on server providers like VULTR. On VULTR you can do it with a “one click” app and it’s super simple to create. On Lightsail it’s a little harder, but I’ll help here.
If you’re interested in seeing Jitsi work, just try out the meeting place at https://meet.jit.si/ it’s totally free to use and you can test out if it will work for you. This looks like mine, except mine is on a custom server and I put my logos in place of the Jitsi logo and changed the wording. It’s easily used in the browser and for phones you either use the browser or the app on by Android and IOS.
This Virtual Private Server installation tutorial is not as perfect as some of my other ones, so you might find that you need a little more help by following the open source projects instructions a little as well.
On Lightsail from AWS you can create a small VPS for about $5 per month with 1 GB Ram and 1 VCPU. Then just have it install Ubuntu 18.04. Once it’s installed just perform the following commands.
sudo apt-get upgrade
sudo apt-get update
If you’d like to be able to use a lobby mode, which I suggest you’ll have to next install prosody.
sudo echo deb http://packages.prosody.im/debian $(lsb_release -sc) main | sudo tee -a /etc/apt/sources.list

sudo wget https://prosody.im/files/prosody-debian-packages.key -O- | sudo apt-key add -

sudo apt-get update

sudo apt-get install prosody
Then you’ll want to check the prosody version. We want it to be Prosody 0.11.2 +
apt list -a prosodyNow we just have to follow the directions on how to install Jitsi:
https://jitsi.github.io/handbook/docs/devops-guide/devops-guide-quickstart
Then I made a lobby area for new people who access it.
Now you have to go to this file: /etc/prosody/conf.d/meet.example.com.cfg.lua
Then check to be sure that it’s modified to look like this:
VirtualHost "meet.example.com"
...
        modules_enabled = {
            ...
            "conference_duration";
            "muc_lobby_rooms";
        }
        c2s_require_encryption = false
        lobby_muc = "lobby.meet.example.com"
        main_muc = "conference.meet.example.com"
        -- muc_lobby_whitelist = { "recorder.meet.example.com" }
...
Component "lobby.meet.example.com" "muc"
    storage = "memory"
    restrict_room_creation = true
    muc_room_locking = false
    muc_room_default_public_jids = true
...
I put it on a custom URL subdomain of one of mine as well. It just chugs along for $5 per month.
After it’s all working snapshot it on lightsail and then if you wish you can make a second version that has powerful moderators who control the meetings more directly. The way to make the second version is a further modification of the file that we talked about just above. This file: /etc/prosody/conf.d/meet.example.com.cfg.lua has to be modified as below. For the powerful moderators add the lobby configuration under the guest VirtualHost (and not to the main VirtualHost).
...
VirtualHost "guest.test.example.com"
    authentication = "anonymous"
    c2s_require_encryption = false
    modules_enabled = {
            "muc_lobby_rooms";
        }

    lobby_muc = "lobby.test.example.com"
    main_muc = "conference.meet.example.com"
   ...

Component "lobby.test.example.com" "muc"
    storage = "memory"
    restrict_room_creation = true
    muc_room_locking = false
    muc_room_default_public_jids = true
If you’d like help with customization, first you need install it and make it work, then after that you can fix it up to make it look more custom. I figured out the places to modify including below:
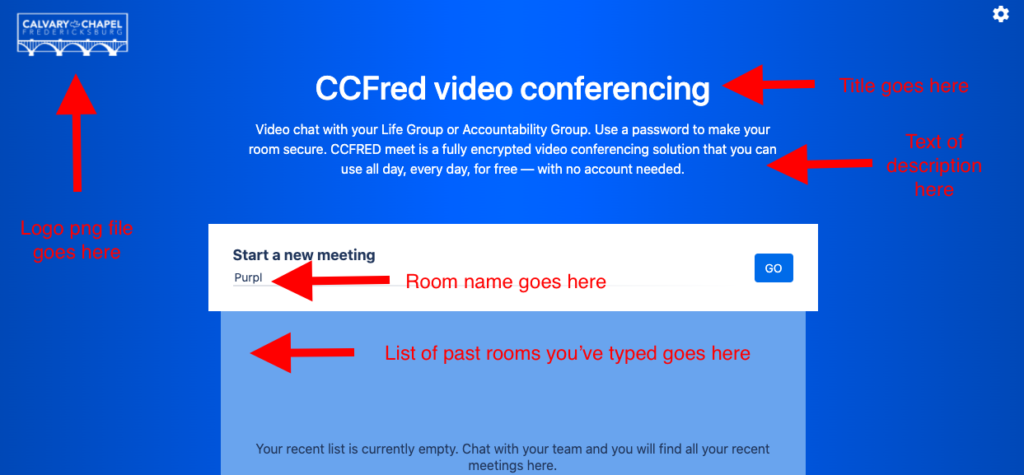
/usr/share/jitsi-meet/images/watermark.png – This is to put you’re own logo on the page, as seen in the top left of the image above. You just upload a new PNG file to that location and make the name “watermark.png” and it will appear in the top left of the home page. You can then change the link that it refers to by changing it in the files below.
/usr/share/jitsi-meet/libs/app.bundle.min.js – This is where you can modify what’s said on the front page in writing. This is like the top middle section of the image above.
When you wish to make a room to meet in, you type a room name of your choice in the center of the page. It has random words that scroll by to form room names that you can choose at random just by hitting the enter key and it creates a room with that complicated name.
/usr/share/jitsi-meet/interface_config.js – This is where you can delete buttons you don’t want for options and also where you can change it to say something custom when people enter the meeting, instead of “fellow Jitster”. You just search for “fellow jitster” and replace it with your own phrase. You can also change that link to the watermark image here, by searching for “jitsi.org” one of those references is next to the watermark.png file reference and if you change it to your website, then that will be the link if the watermark is clicked on.
In each of the files locations stated above, I searched for the parts of the original phrases that I wanted to change and then I just put in my own chosen phrases.
If you need any help with any of it, just let me know. I’d be happy to help a bit.